When traders discuss success in financial markets, they often focus on strategies, indicators, or the latest news driving volatility. Yet the difference between survival and ruin, between steady compounding and account blow-ups, frequently comes down to something far less glamorous: position sizing.
Even traders who can read charts well and identify attractive opportunities can lose consistently if their trade size is mismatched to risk. Too much size turns a normal stop-out into a catastrophic loss. Too little size means even correct trades fail to move the equity curve. Position sizing is the discipline that sits between strategy and psychology. It is not about predicting markets, but about controlling risk and ensuring consistency.
Why Position Sizing Matters
In both forex and crypto, markets are dynamic. A solid Swing Trading Strategy or Day Trading Strategy can still underperform when volatility spikes or spreads widen. Good position sizing addresses this by:
- controlling risk per trade and reducing the chance of ruin;
- accounting for costs such as the bid/ask spread and occasional slippage;
- helping traders withstand inevitable losing streaks;
- enabling a consistent approach to both long and short positions.
Without sizing discipline, even a “best forex trading platform for beginners” cannot protect accounts from emotional decisions. Correct sizing brings order to execution.
The Core Formula
At its simplest, position size comes from three inputs:
- Account risk per trade – often 0.5–2% of total equity.
- Stop-loss distance – the number of pips, dollars or points to the exit.
- Instrument value per pip/point – determined by contract specifications.
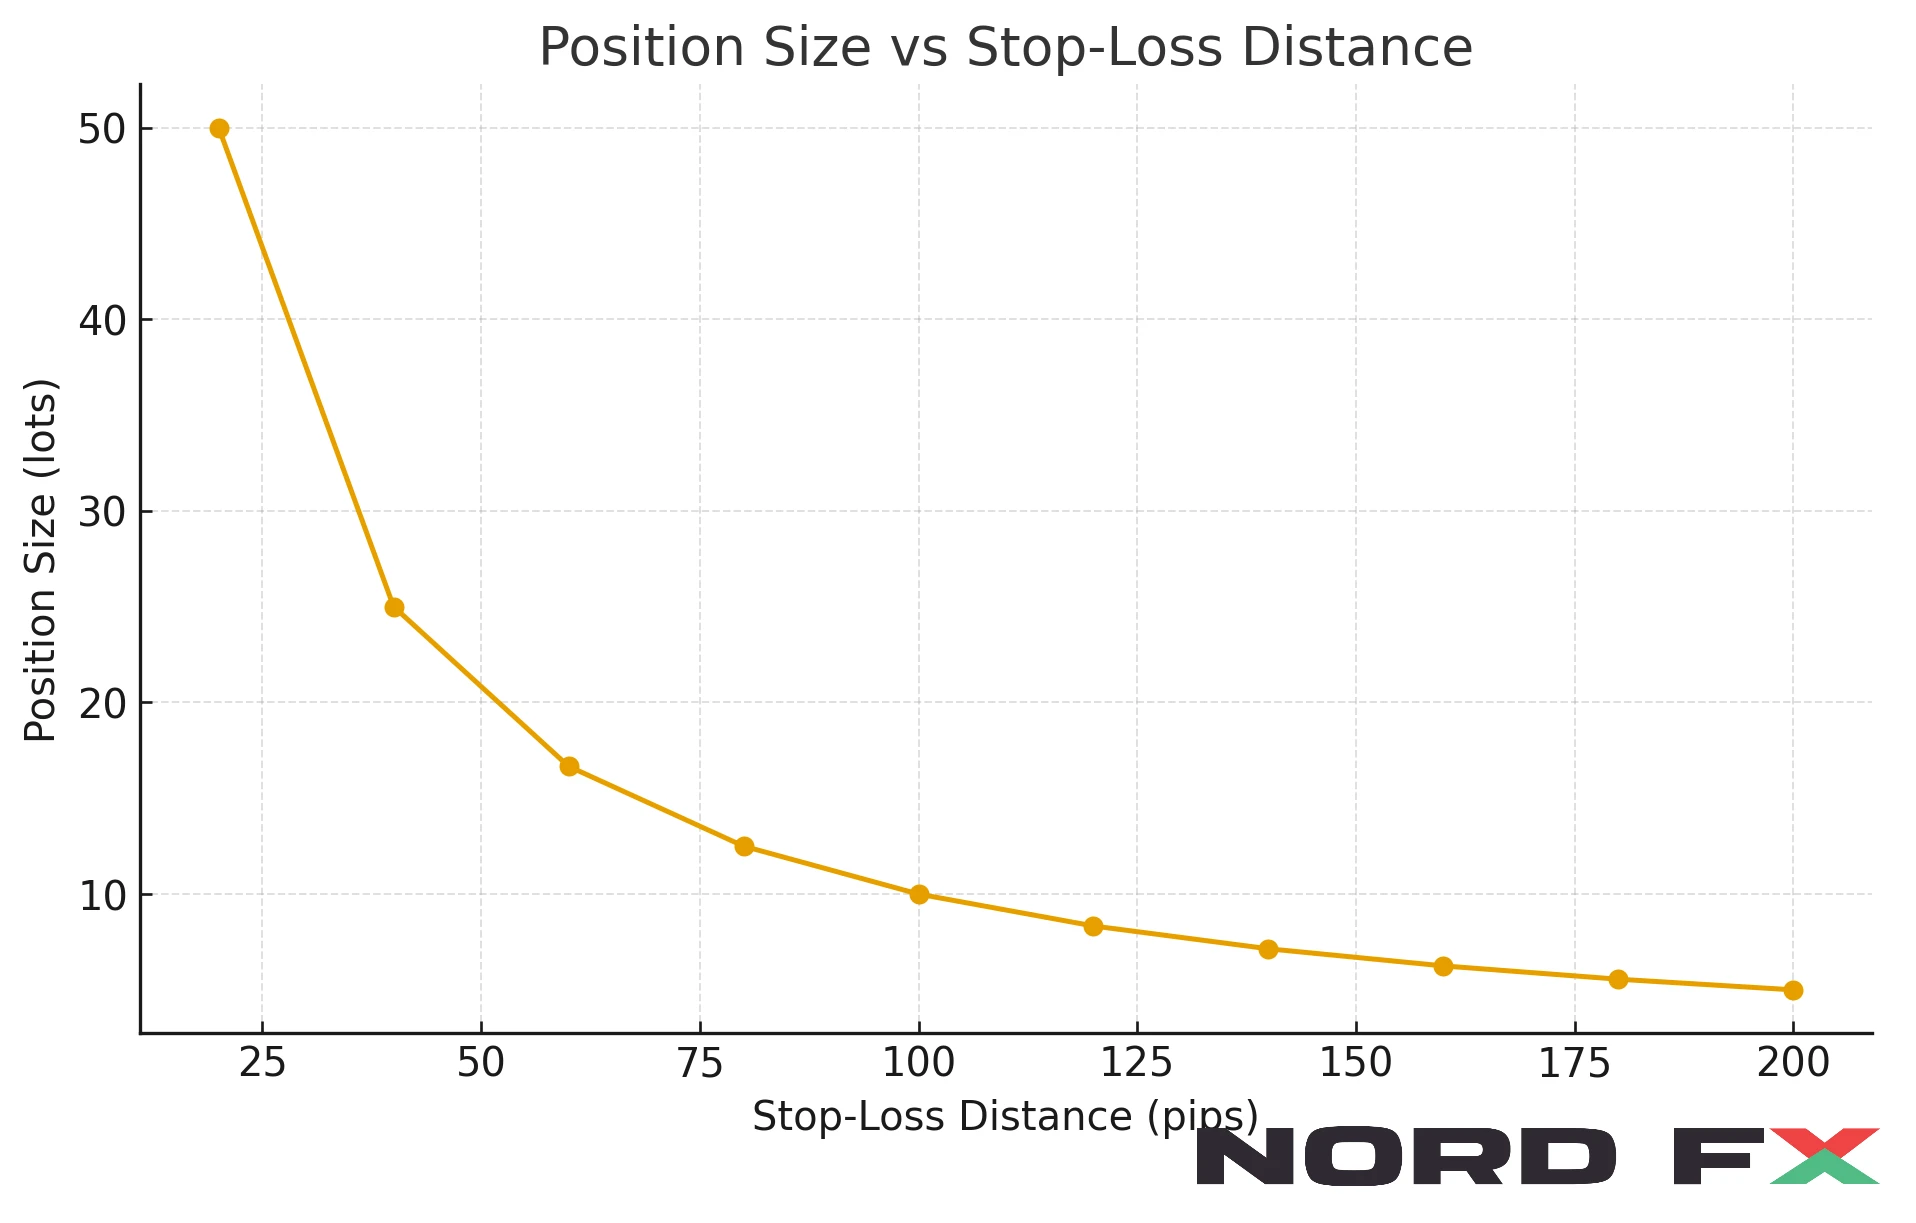
Position size = Money at risk ÷ Stop-loss distance (in money terms).
This is universal. Whether trading GBP/USD, gold, or a pair such as SOLUSD, the calculation is the same. Of course, precise sizing requires checking spreads and contract values on your trading platforms before executing.
📊 Visual reference: Position size falls as stop-loss distance widens.
Four Frameworks for Position Sizing
1. Fixed-Fractional (ideal for beginners)
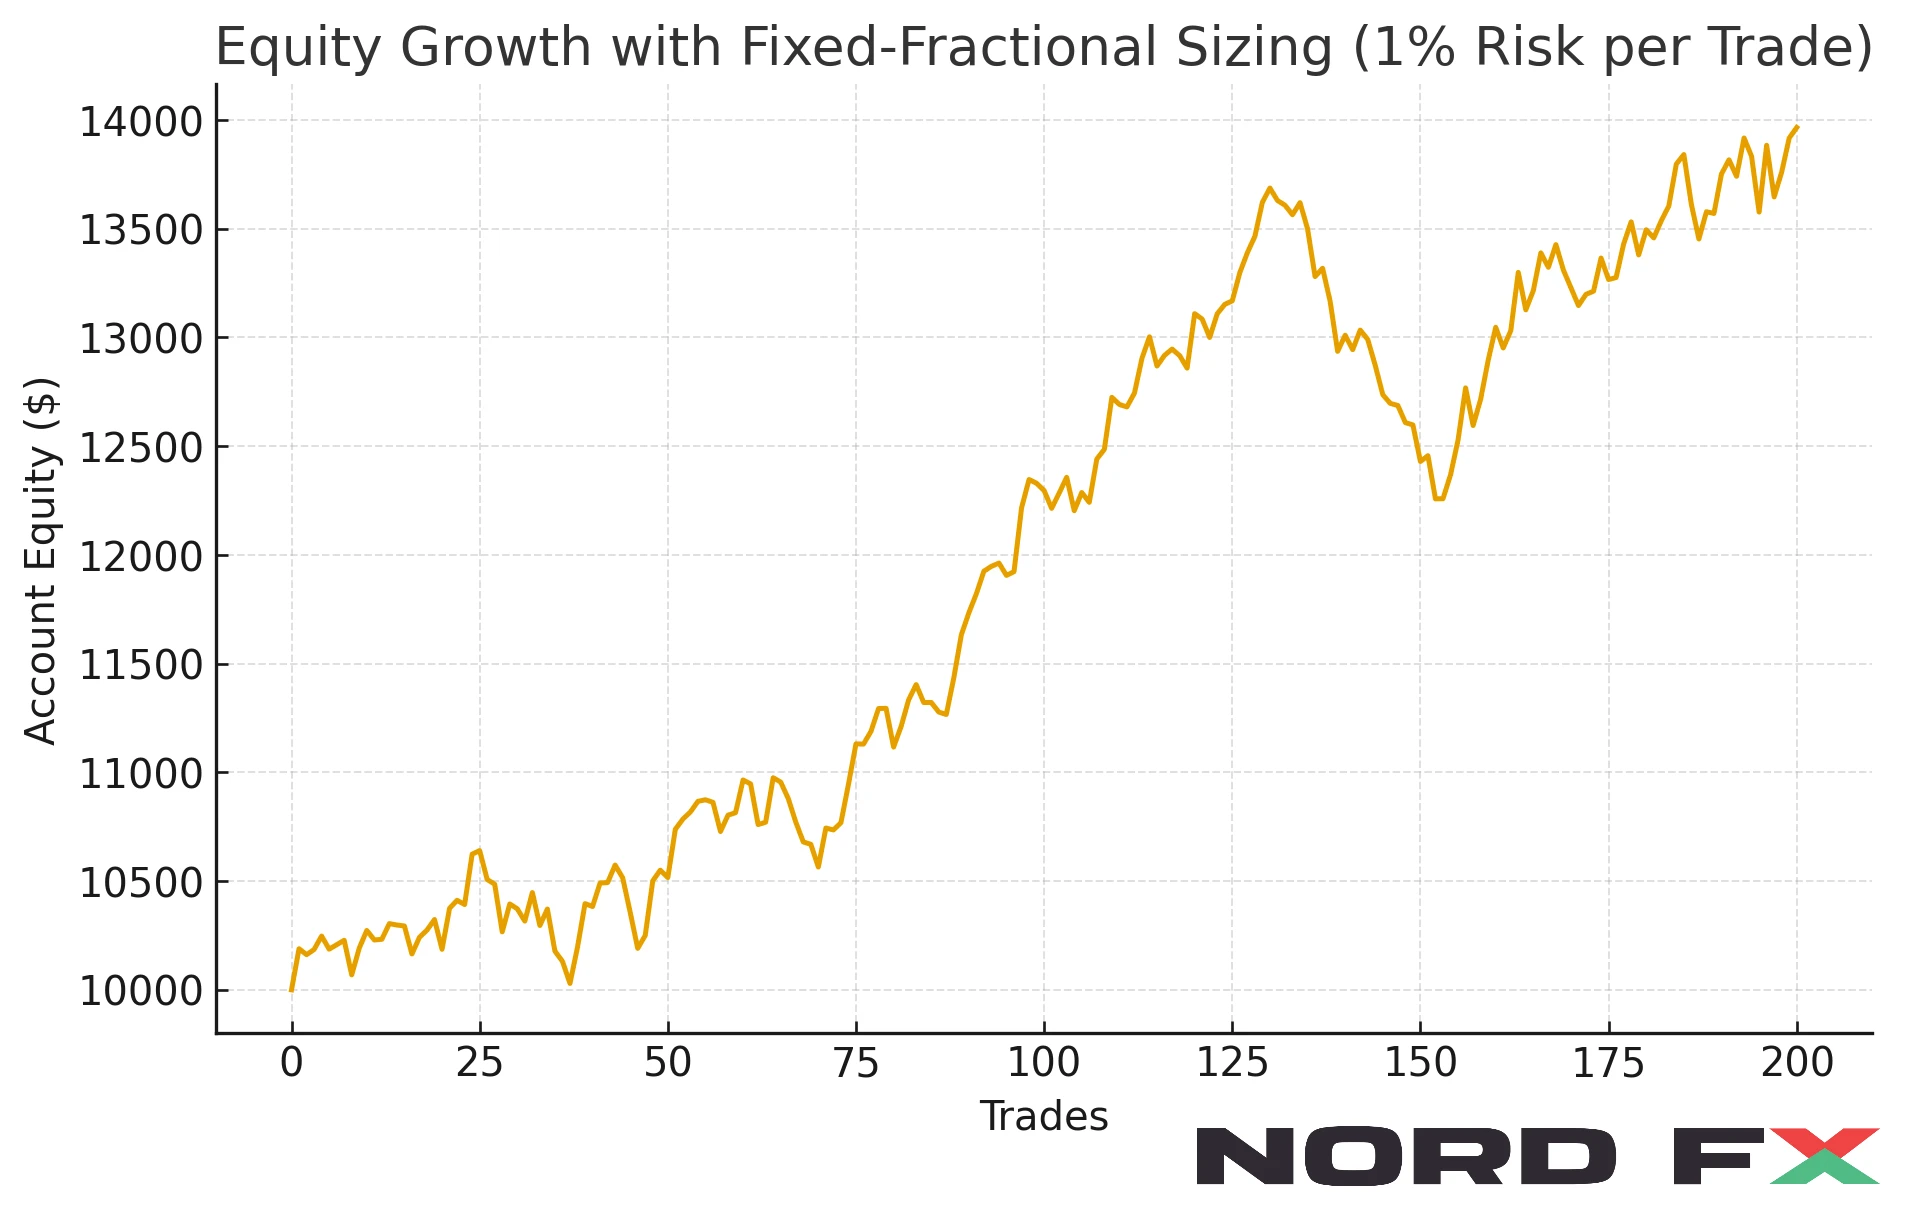
This is the default for many. The trader risks a constant percentage of account equity on every trade. If the account is $10,000 and the chosen risk is 1%, then every trade is designed to risk $100.
It is simple, scalable, and prevents emotional oversizing. For new traders, it is often the best entry point.
📊 Visual reference: steady equity growth using 1% fixed-fractional risk.

2. Volatility-Based (using ATR)
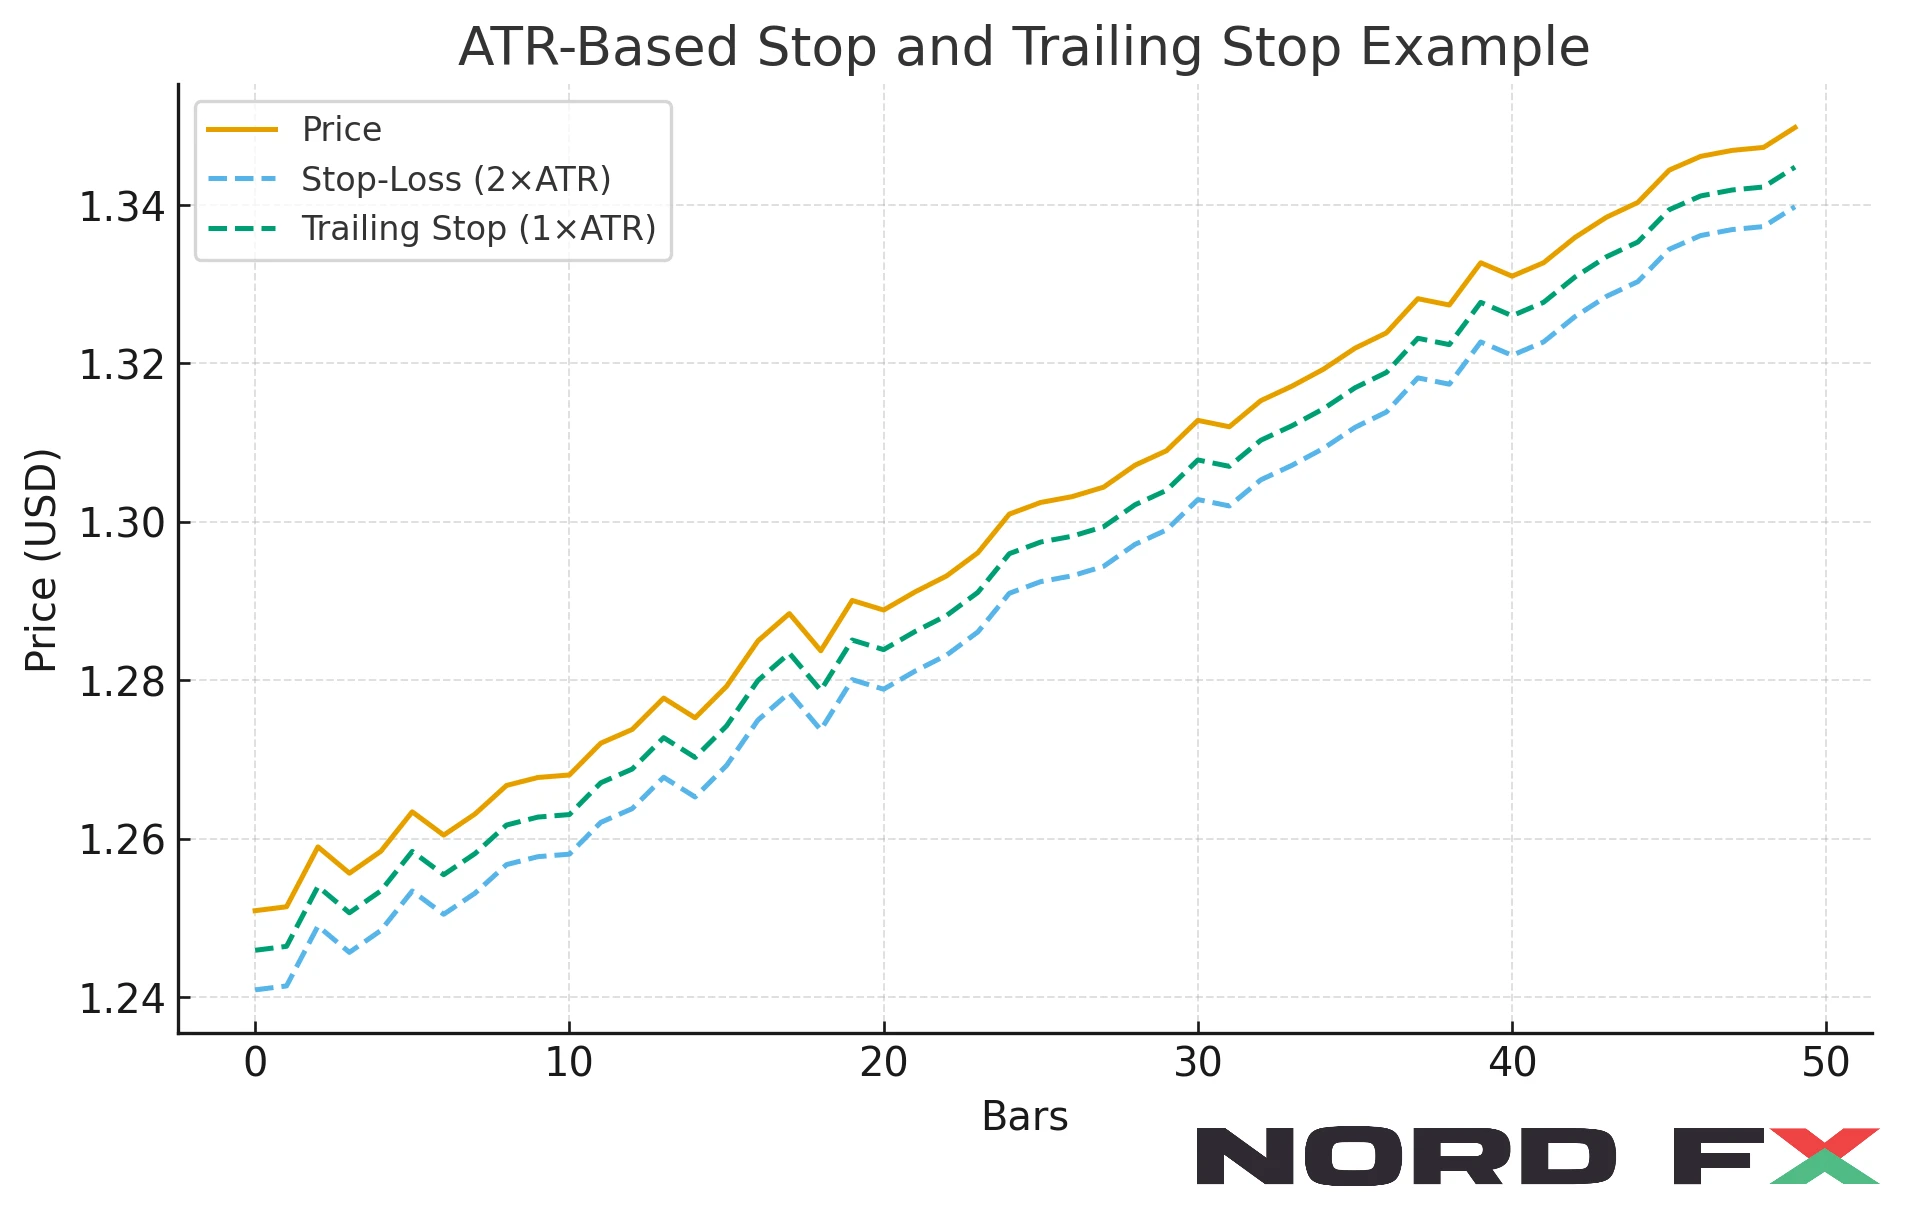
Markets expand and contract. A static 50-pip stop might be appropriate one week but hopelessly tight the next. The Average True Range (ATR) measures recent volatility, and multiplying it gives a dynamic stop.
A trader might, for example, set a stop 2×ATR away from entry. The position size then adapts to this distance. When volatility is high, size shrinks. When volatility is calm, size expands.
📊 Visual reference: ATR-based stop and trailing stop.

3. Kelly-Style (advanced and aggressive)
The Kelly criterion was designed for betting systems and later adapted to trading. It calculates the optimal fraction of capital to risk based on edge and win/loss ratio. While mathematically powerful, in practice it is too aggressive for the uncertain nature of markets.
Most professionals who explore Kelly sizing use half-Kelly or less, treating it as an upper bound rather than a target.
4. Volatility Targeting (portfolio level)
Rather than sizing each trade in isolation, some traders adjust all positions so that the overall portfolio maintains a target level of volatility. When volatility rises, positions are scaled down; when it falls, they are scaled up.
This method is widely used by hedge funds and systematic managers, but the logic is accessible: it aims for smoother equity curves by moderating exposure.
A Step-by-Step Template
A simple reusable process can help traders stay consistent:
- Choose risk per trade. Most stop at 1% or less.
- Decide the stop. Structural (below support, above resistance) or volatility-based (ATR).
- Calculate position size. Use the formula.
- Set exits. Place take-profit levels and define any trailing stop-loss.
- Check spreads and liquidity. Wide bid/ask spreads may require smaller size.
- Align with higher timeframe. Use the daily chart for context.
- Adjust for news or thin markets. Cut size when uncertainty is elevated.
Example A: GBP/USD Swing Trade on the Daily ChartAccount: $10,000
- Risk: 1% ($100)
- ATR(14): 90 pips
- Stop: 135 pips (1.5×ATR)
- Pip value: $10 per lot
- Position size: ≈0.07 lots
Exit: target 2R (270 pips) with a trailing stop based on 1×ATR once price moves in favour.
Example B: SOLUSD Breakout on Intraday Chart
- Account: $10,000
- Risk: 0.5% ($50)
- ATR(14) on 15-minute chart: 0.28
- Stop: 0.56 (2×ATR)
- Position size: ≈89 SOL
During breakouts, crypto spreads can widen rapidly. Reducing size slightly when the bid/ask expands provides added safety.
Trailing Stops in Practice
Trailing Stops are among the most useful tools once a trade moves in your favour.
- Trend-following: ATR or Chandelier trailing stops help capture large swings without exiting too early.
- Range conditions: fixed take-profits often work better than tight trails, as prices tend to whip back.
- News releases: spreads and slippage can be severe. Halving size or standing aside entirely is often wiser than relying on tight trailing stops.
Take-Profit Tactics
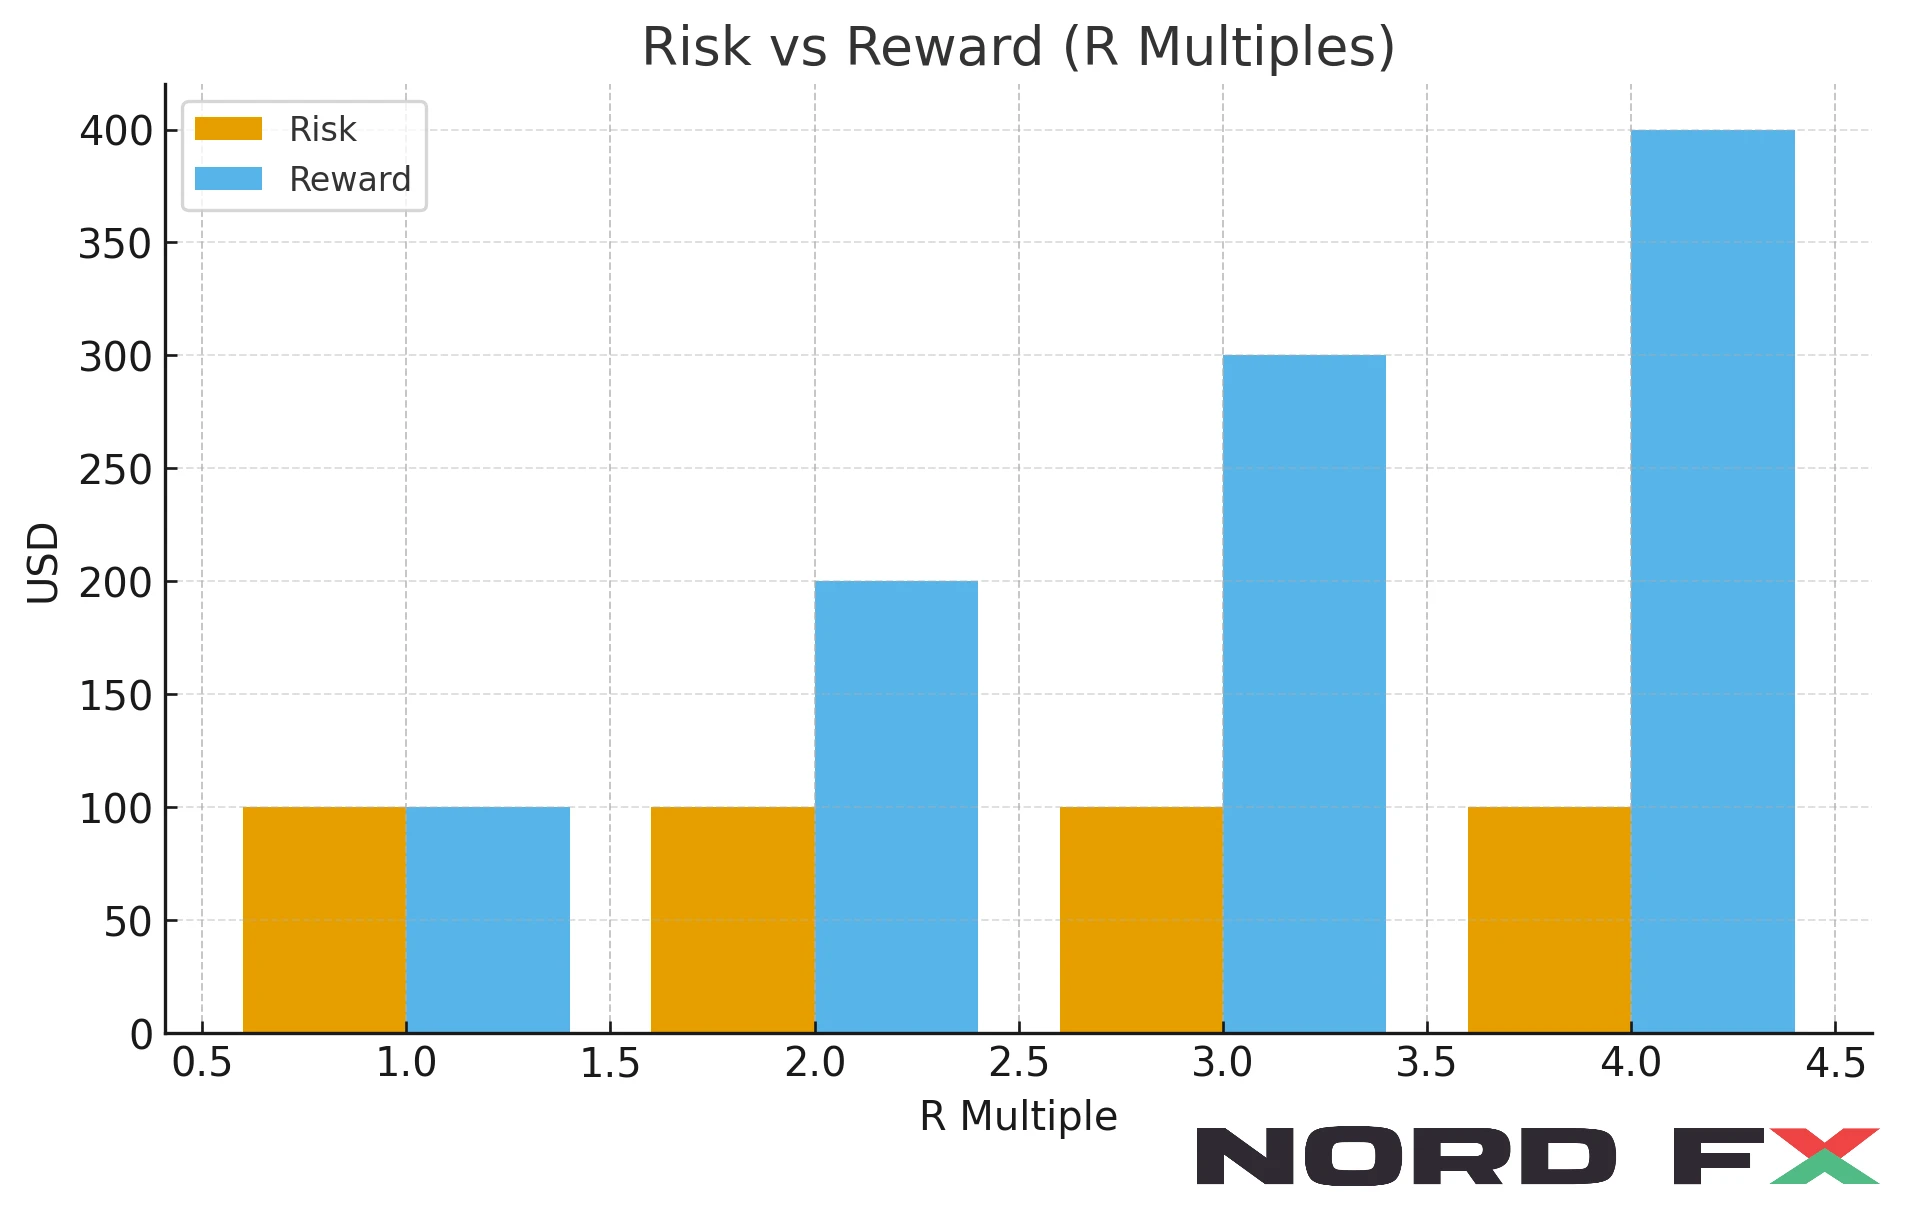
Defining exits in terms of R multiples — where 1R is the initial risk — makes performance consistent. For instance, taking profit at 2R means earning twice the risked amount.
📊 Visual reference: comparison of risk to reward at different R multiples.

Some traders scale out: half the position at 1R, let the remainder run with a trailing stop. This blend of fixed target and flexibility smooths results across markets.
Common Mistakes and Fixes
- Oversizing after a loss. Trying to win back quickly is how accounts implode.
- Stops that ignore timeframe. A swing trade should not use scalp-tight stops.
- Forgetting the bid/ask spread. Wide spreads, particularly in exotic FX or low-liquidity coins, can turn good trades into breakeven exits.
- Chasing consolidation breakouts without buffer. Breakouts often fail; size conservatively until confirmed.
The fix is discipline. Decide size logically before entry and stick with it.
Quick Checklist
- Risk fraction chosen (0.5–1%).
- Stop defined first, then size calculated.
- Take-profit and trailing stop prepared.
- Spreads and liquidity checked.
- Daily chart context considered.
- News risks reviewed.
Sidebar: How to Buy (Reusable for Multiple Pairs)
This checklist applies to pairs such as BNBUSD, DOGEUSD, DOTUSD, ETCUSD, FILUSD, LINKUSD, LTCUSD, MATICUSD, SOLUSD, UNIUSD and XRPUSD.
How to Buy [Pair]:
- Choose market access. Use a trading platform or broker that lists the pair in spot or futures form.
- Fund your account. Deposit fiat currencies or stablecoins.
- Select an order type. Market order for immediate execution, limit order for a specific price.
- Set risk controls. Define a stop-loss and calculate position size using the methods above.
- Plan exits. Place take-profit levels or use trailing stops if the trend extends.
- Secure storage. If the intention is long-term holding, transfer to a blockchain wallet once the trade is closed.
Final Thoughts
Traders are often tempted by indicators, exotic strategies, or the latest blockchain trend. But the most enduring edge is usually the least glamorous. Position sizing is the quiet tool that keeps risk controlled, accounts steady, and psychology balanced.
Whether trading GBP, higher-yielding currencies, or crypto favourites such as Solana and Cardano, success depends less on predicting markets and more on structuring trades properly. For beginners and professionals alike, mastering position sizing is a foundation that allows every other part of trading to work.
For more context, you can also review NordFX’s trading account types and explore other educational resources to strengthen your approach.
Go Back Go Back
